#1
Start with new rotors or cut the used rotors on a brake
finishing lathe using sharp bits and correct feed
speeds.
As always, best results will be achieved by closely
following the set-up and maintenance instructions in the
lathe owners manual. (Note: We have found the newer
style GWR
"Round Lathe Bits"
produce consistent, lower RA finishes than standard
bits)
#2
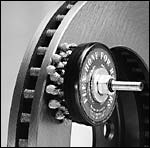
Use the new, patented
Flexible
Hone for Rotors
on both friction surfaces of the new or turned rotors,
to create and O.E. style cross-hatch.
(Note: An angle head, electric drill is highly
recommended as it's speed is more constant and
rotational torque is virtually eliminated). It only
takes about 20 seconds to "re-profile the surface" and
create the perfect bedding surface for your new pad.
Simply move the spinning tool across the surface (in and
out motion) about five times and then make one slow pass
from inside to outside, to deliver a final symmetrical
pattern. (Note: Contrary to popular belief, laboratory
testing has determined sand paper or round discs do
not produce the proper rotor finish needed to
control (slow down) the burnish of a new pad.)
#3
Thoroughly clean the friction surfaces and hat area of
the rotor with
GWR Brake-Soap
and water solution... using a hand scrub brush.
It has been proven in the laboratory that this helps to
demagnetize and then remove imbedded micro fine steel
particles significantly better than aerosol brake
cleaners. When scrubbing is finished, rinse completely
with clean water and then air dry.
#4
Spray a very light, even
coat of
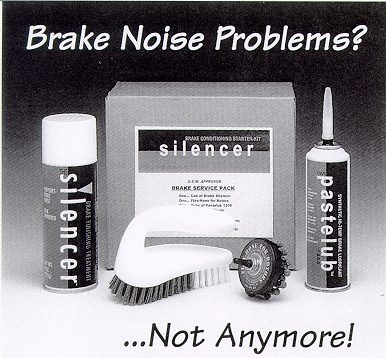
the Silencer - Brake Conditioning Treatment
on both sides (friction surfaces) of the rotor.
Be sure to shake the can well to completely disperse the
solid particles into the synthetic carrier the Silencer
treatment uses to deliver them to the rotor. (Notes: You
don't need a lot of this product to do the job
correctly, only a light single coating of the rotor is
necessary. Additionally, no
drying time is required before assembly or
driving.)
A little freebie tip... You can spray a light
coat of GWR "Silencer" on calipers and the entire rotor,
to eliminate rusting in harsh environments or extended
winter storage periods.
It will leave a beautiful silver appearance that last
for years because it's impervious to water, snow, salt,
heat, cold and other conditions. Additionally, it does
not get sticky or effect brake action so you don't have
to remove it before putting stored vehicles into service
each season.
WARNING:
Several large packaging companies have attempted to copy
the OE Approved "Silencer-Brake Conditioning Treatment"
in recent years.
What's more interesting is... most came to GWR and ask
us to private label the real Silencer for them first.
Why? Because it works, it's safe and they did not have
the expertise to do it themselves! Unfortunately for the
driving public, when we quoted them prices they all said
"you're too expensive, we can make it for about a $1 a
can!"
Well, they're right! You can make it for $1 a can. If
you leave out the real synthetic carrier, leave out the
special high pressure synthetic oils, leave out the
anti-corrosive agents, leave out the expensive moly
powder, leave out the specially shaped particulates of
aluminum and graphite, etc, etc.
As you can imagine...
these companies did go forward and make their own cheap
versions because major profits were anticipated. To
reduce the cost, they used petroleum for the carrier and
eliminated most of the other important components we
include!
The question is "can you", the consumer or shop, afford
to take a chance on these Non OEM Approved and
potentially dangerous brake products when it comes to
your own car, or that of your customers?" Worse can you
depend on chemical "packaging" companies to be experts
in the brake business???
If
you are in doubt about a product you are using or are
thinking of using, just check the ingredients listed on
the label of the can. If you find Mineral Spirits or
Stoddard Solvent listed, the product can "not" be used
on brake rotors without voiding the new pad warrantee
and making them unsafe!
Simply stated, "no product other than "the Silencer" is
a "Real Synthetic" formulation. All the copies are base
on petroleum products and lack the important ingredients
that are required to give the long lasting desired
results... no brake noise!
You
have our word, based on over 30 years in the business in
the USA and 75 years in Switzerland, none of the copies
are even close to our original Silencer product!
Neither do they share the national and international
awards, accolades, O.E.M. endorsements or safety level.
If you have been told any other brake conditioner is
equal to or better than Silencer... please call GWR and
let us know. We would like to tell you the whole story
and explain the real difference between the original and
the copies. Additionally, we'll show you why there are
safety issues involved that "will" affect you
personally. Thanks, GWR
#5
Apply
Pastelub-2400 Extreme
Hi-Temp Synthetic Dry-film Lubricant to caliper mounting
brackets, mounting bolt threads, the rust free hat area
at center of rotor (thoroughly clean before
turning if any rust is present) and any other metal to
metal contact points. Next, coat caliper piston face
(where pad backing plate contact occurs) and or the back
of the brake pad, along with any other points of contact
(guide ears, etc) with
Ceramlub-2800
Ultra
Hi-Temp Synthetic Dry-film Lubricant
(Note: Do not use low temp moly style greases (300º to
600º) or any type silicone (maximum of 400º) for any of
these applications as they will break down with heat and
pressure and generally cause contamination of friction
surfaces during this change. Note that the revolutionary
Ceramlub lubricant is far superior to all silicone type
lube products commonly used on slide pins, etc, based on
it 2800º temperature rating and real synthetic formula.
#6
Assemble per recommended O.E. procedures, using new
brake hardware, then test drive the vehicle. VERY
IMPORTANT: Initially make about 20 to 30 ultra light
pedal "slow downs" from 30 mph to 5 mph but do
not completely "stop" the vehicle. Next make 20 to 30
"full stops" from 30 mph but not panic style.
Be sure
to allow about
1 to 2
minutes for cool down between each slowing or stopping
cycle. This is critical because it allows the rotors and
pads to adjust to each other and for embedded
temperature increases to bleed off. This break in
procedure may seem extreme to some technician, but this
is the "only" way to properly burnish a new set of pads
to a rotor... intense dyno and road testing has proven
it.
(Be sure to
tell customers no panic stops for at least 300 miles,
the average "real burnish period".
This light and then heavier stopping procedure, properly
burnishes the Silencer's micro-fine particles into the
friction surfaces and conditions (softens) the burnish
process. The goal is to slow down the
burnish and control the pressures and higher burnish
temperatures new pads are exposed to, for the
longest period of time. The hotter and harder a
pad is pushed during its break in period (post cure) the
harder it becomes (shore) and therefore the worse the
performance. There are several laboratory measurements
in our industry, including FEI (Friction Energy Index),
Coefficient of Friction, D3EA, (Multi Variable Dyno
Evaluation), BEEP (Brake Effectiveness Evaluation
Procedure), Torque, etc. used to determine friction
performance. By using GWR's five steps and products, you
will improve a vehicles test numbers by up to 8%. This
proves to be not only a better feeling, noise free pad
but the vehicle actually stops shorter and is safer.
| |
Introductory Promo!
ALL THE ABOVE COMPONENTS IN ONE KIT.... |
|
| |
At Very Special Prices! |
|
| |
|
|
 |
Click here for $100 Discount
on GWR's Deluxe Brake Service Kit
Click Here to
Save on your Starter Kit |
 |
| |
|
|
.jpg) |
Click here for hundreds of
Brake Service Tools and Parts Discounted
at up to 70% of OEM Suggest List Prices
Click
Here for Savings |
 |
| |
|
|
.gif)


.jpg)

